June 26, 2011

Happy Father’s Day (a week later) :)

Well first of all I need to say HAPPY FATHERS DAY!!!!! I spent the beginning of this crazy, busy week with my two favorite parents!!! It was a fun-filled day of playing with dogs, shopping for flowers, and tearing down wallpaper.

Here are a few pictures of my gift to my dad… A trip to Lowe’s so he could purchase anything he wanted (with a limit of course haha). Growing up we used to take trips to Lowe's on Sundays just to browse, so it was nice to do that again with him.


 In the end, he ended up with 2 potted plants, and a couple of tools to rip off the wallpaper in the bathroom. I ended up with a couple of supplies on a project I’ve wanted to try (more on that later).
Here are the before and after pictures from taking down their bathroom wallpaper. Luckily for me it was really easy. Most of the sheets came off with just pulling and the other pieces came off with just spraying it with water. Unlike my last attempt at taking down wallpaper, which ended up taking 2 weeks and countless hours scouring, spraying remover, and scrapping off in tiny, tiny pieces. This time it only took about 3 hours, and that was with a dinner break in the middle. Eventually they want to paint, but I’ll have to wait for them to send me pictures of the final “after” these are just “in progress” pictures.


 SOOOOOOOOOO much better, now they need the PERFECT paint color. Maybe a nice latte color something similar to coffee would be nice in there with the blue and cream towels.


Here are some “in progress” pictures of the project I’m working on. I saw this inspiration picture one night and figured I would be able to make one myself.


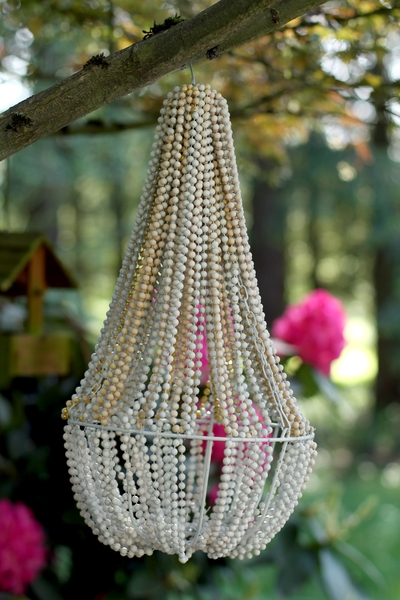
 In the next few days I will hopefully have some finished pictures of the strands of beads along with a proper tutorial, but for now here are some teasers. First I gathered all the random Mardi gras beads that I had around the house and spray painted them soft yellow. I also spray painted a plant hanging basket from Lowes the same color. The next steps will be to attach the beads to the plant hanger. More to come later…


They will need some more paint, but it will be easy to add that once they are attached to the plant holder.


June 19, 2011

Sleeping like "Kings"

   It finally arrived!!!! After being delayed a day for a late truck, the delivery men finally dropped off our new mattress yesterday! I must say I LOVE IT!!!!! There is so much room now! So without further ado here are some before and after pictures. We haven’t gotten any bed linens or a headboard yet, so these are “in progress” pictures of what it will actually look like.

Before (full mattress)
 That beautiful dog is my oldest dog, Marley, one of the reasons we need a bigger bed.


After (king mattress!!)
   It's a little hard to tell from the pictures that its bigger, just look at the pillows. First picture they were right together, this picture there is a space between. For now we've left the comforter from the other bed on this one, just turned it around so it would fit.


Even the dogs like the new bed. Marley slept on it all day yesterday. I guess its safe to say we got his seal of approval. Oh and the other dog is our youngest, Lexi. Aren't they the cutest dogs?

So for now, I’ve been looking online for a new headboard and linens, so here are some of my favorites.   The first one from Target is probably the front runner, but at $370 I'm going to have to save up some money. :)
from Target
from Ikea


from Overstock.com

From Target


   Here are some of the comforter options I like. There's a lot of different color combinations, so we can come up with some different options.  The first two are my favorites. The gray is a safe choice, but I feel like I always tend to go for black, white, or gray.


from colourmehappyblog.blogspot.com


From Bed Bath and Beyond


From Target

From Khols
   
 Hopefully we can decide on the textiles soon, until then I'll be happy not sleeping on the edge of the bed.

PS. The Headboards are found here, here, here, and here. Comforters found here, here, here, and here!

June 14, 2011

The Goldilocks of Mattress Shopping

   Last weekend was nothing but fun! Between weddings and birthday dinners, Shane and I picked out what I’ve been waiting on for a LONG time! A king size mattress!!! What should have been an easy task to find a cheap one that is comfortable, actually ended up being a 3 hour long mattress test drive.
   It started off with me driving around town earlier in the week “checking out prices” I went to a couple of furniture stores and mattress places, till my friend told me about Sleep Outfitters.
 They were having a great sale… Buy a King for the price of a Queen! Perfect! We all know how I love a good sale, so I went right over drove across town to the showroom. I found out later there was one 5 minutes from our house… whoops. Once I looked around a little bit, laid on a couple of beds, and decided that there were a couple that were reasonably priced so I would bring back Shane on Saturday so he could decide on the one he liked.
   When Saturday rolled around we hopped in the car and headed over to the showroom. Of course he had all kinds of questions, “Did you look online at the reviews?” “Did you see all the mattresses in town to know this is the one?” “What is the model number so we can price match?”  -- You get the point.
   When we got inside, we started looking around. I showed him the beds I was thinking about and he tried them out. He laid down on the first one and I’m pretty sure he was silent for five a few minutes when I finally asked him if he liked it. All he said was it was too soft. There started the two hour decision process of him and me trying out ALL the beds in the store (about 20-25). He would lay down stare at the ceiling and twirl his thumbs, then get up and move to the next one. He did this not once, not twice, but probably three times to each of the beds. I felt so sorry for the salesman. He would suggest one, then another, then finally just sat down on one of the beds and watched. I’m pretty sure he was just ready to make the sale because at one point he asked Shane, “Is there any bed in the store you would consider buying?” He said all of the beds were too soft, I said the ones he liked were too hard…  It was like he was Goldilocks. I was beginning to wonder if we would ever find one that was "just right." 
   Finally, after going through one row at a time, we had our choices narrowed down to three. One bed was the one I had first suggested as part of the sales promotion (a Serta), one was a Sterns and Foster, and the other was a Simmons Beautyrest.

   
The bed that ended up being “just right” was the Simmons! (it took another 30 minutes deciding between the three haha) It wasn't one that was on sale, but after being in there for so long, i was just glad we found something. It ended up being a little over $1,500 which was a little more than I hoped to pay, but I guess it's worth it since I'll be spending about 7 hours a night on it for a good 15 years? hopefully? For my half, it comes out to only $0.15 per day - pocket change for a good night's sleep!
   We finished the paperwork and purchasing, and now are just in the waiting game till Thursday when our new mattress, box spring, and bed frame (thrown in for free!) will be delivered! I can’t wait till I don’t have to sleep on the edge of the bed while my children dogs sleep like kings! Now we just have to look for a headboard and linens… YAY more shopping!!

June 13, 2011

Let us EAT!

   Since Shane and I have been watching Cougar Town for a couple of seasons, I have had my eyes on this wall decoration on Courtney Cox’s kitchen wall. I loved the colors of the letters and just the general typography of them. I figured they would be pretty easy to replicate. My brain created my next DIY project.


   There were the same letters at Anthroplogie for $14 each. I had heard that JoAnn Fabrics had letters to use for about $3 a piece. However, when I visited my local store, they didn’t have any of the large letters I wanted to use. Sooo I ended up just get a couple of fabric quarters to think about using on letters once I found some. Each fabric square was about 2 dollars and I purchased a few colors and prints. I figured I could use what I don’t need on other craft projects.


   My next stop in town was to Hobby Lobby. Thankfully they had a couple of options when it came to letters. I had it narrowed down to either wooden letters or a cardboard letter. In the end the cardboard won due to its lightweight and less “serifs” making them easier to cover and easier to hang!

   Once I got the letters home, I painted the front of them with leftover primer I had around the house. Now the fabric would be true to the color versus what it would look like on top of cardboard.

   Once the paint was dry, I covered each letter with fabric or ribbon. I secured the ends with a little dot of hot glue. You could easily use scrapbook paper and Mod Podge to cover letters as well. The possibilities are endless with how you personalize them.


TaDa!!!


   When I finished covering the letters, I use a couple of strips of 3m Command Strips to attach them to the wall.


Now they are placed right above the center bay window in my kitchen. I couldn’t be happier with the way they turned out!!

June 1, 2011

Picture Wall... Check!

After seeing this picture from a blog I read just about everyday, I was really inspired to do this in our house. I just needed to figure out a space. I decided that going up the stairs would be a good place.  So off I started!

Photo from http://www.younghouselove.com/
Here is a step-by-step of how I made my picture wall.

Step 1 - Buy really cheap frames.
   I looked at Goodwill, Salvation Army, and around my house for frames that would work. I knew that I was going to spray paint them, so it really didn't matter what color it was, just that it was in good shape. I think the total cost of frames was about $13. Here is a picture of the ones I bought.


Step 2 - Clean and Spray paint all the frames white
   It took a couple of coats of spray paint. I actually ended up painting some with extra primer I had in the garage to touch up what the spray paint didn't cover.

Before...


After one coat

Step 3 - Decide the layout
   After letting the paint dry overnight, I made templates out of each of the frames and by using painters tape I taped them up to the wall in the layout I wanted to use. (For some reason i forgot to take a picture of this step ) but you can use your imagination as to what it would look like. After asking opinions from Shane and my sister, I had the final layout planned.

Step 4 - Choose art, and hang the frames
   I haven't quiet picked out all the art or pictures that I want to use so some of my frames are still blank. I have also used some left over scrapbook paper for some not-so-picture art.
   To hang the frames I either used Command hanging strips or used nails. With the templates on the wall it was really easy to measure where to put the nails. I was able to just nail right through the newspaper and pull it off to see a clean nail. EASY!!

This can give you a slight idea of what the templates looked like!

Step 5 - Step back and Enjoy!
   After putting nails in the wall and putting hang strips on the frames, it only took about 10 minutes to finish the project.
   Here are some after shots!!!


I'm happy with the way it turned out, and one more thing to cross off my wish list!!! In the future I would like to add some professional matting to some of the photos, but for now this will work!

Total Cost -- $23 -- not too shabby for 14 frames!
- Frames -- $13
- Paint -- $4
- Hanging Strips -- $6

May 31, 2011

Our House Wish List

   Well since I posted yesterday that we are working on marking things off our House To-Do Wish List, I thought it would be a good idea to actually post our wish list. Most of the items are long-term ideas. I know that some wont happen right away, and actually might take years to accomplish. At least we will have something to go by and remind ourselves what we've done.

Our House Wish List

- Lay hard wood floors (or laminate) on 1st floor. Maybe a bamboo type?
- Redo Kitchen countertops maybe granite overlay? or concrete?
- Replace Kitchen light fixture
- Replace Dining room light
- Replace Living room ceiling fan with one with lights
- Get new entertainment center (one that will fit ALL the speakers)
- Get new area rug for living area ~ once we have the wood floors of course
- Replace the builder bland brass knobs and hinges with oil rub bronze
- Get new light fixture for master bath (maybe 2 instead of 1?)
- Save up for a king size bed!!
- Have a wall of photos & such somewhere, (staircase?)
- Make some no-sew curtains or roman shades for the guest bedroom
- Make valances or something simple for the kitchen
- Buy baby gate for the stairs and front porch for the dogs
- Trim Ivy, or get rid of it!!  DONE!!!
- Put a peep hole in the front door
-  Build a countertop for the laundry room (something painted out of plywood maybe)

I'm sure we will be adding to this list over time. For now it's a good starting point.
Stay tuned for updates!!

Ivy & Weeds = 0, Shane & Alli = 1

   Shane and I took full advantage of the fact we both had off this Memorial Day and did some much needed yard work. After seeing the English Ivy slowly take over our backyard for months, we knew it was time to do something about it! We aren't sure where the ivy came from or who thought it was a good idea to plant it, but one thing is for sure... ITS GOTTA GO!!!!

The Opponents
   I guess we should start with some "before" pictures of our opponents: the back yard.


As you can see the Ivy is EVERYWHERE!! Below is a different view to put it in perspective of how much there is. It looks like a bad disease is growing on our fence.


   And of course I cant forget the flower beds. The first before picture was taken in April, when I attempted to plant flowers from bulbs and seeds. I, however, failed miserably. After weeks of rain and personal neglect (sorry flowers) the beds were now full of flowers... or weeds. Probably more of the latter. Actually, I'm pretty sure I was starting to grow oak trees. Whoops.


   Yes I know, its embarrassing. I guess you could say I let it get out of hand. I was scared to pull anything out because I wasn't sure what were weeds and what were flowers.

Round One

   Our day began at about eleven while it was a cool 80 degrees. Shane started on the ivy and I started on the flower beds. My first thought was to try to save some of the flowers. That quickly went south when i decided it was just way too hard and way too hot to try to save anything. With my shovel and trusty Lowe's yard bags I began clearing out all the flowers weeds. Shane pretty much took out all his built up aggression on the ivy. He pulled it out, cut some with garden shears, and also raked the ground from dead leaves and such.

   Once we found a good stopping point it was time for lunch and a quick trip to Lowe's for NEW flowers and mulch. Our quick trip ended up taking two hours and three stops. Subway for lunch, Shane's first trip to Sam's Club (he said he could spend hours in there), and finally to Lowe's. After a long debate, planning, and picking out our top picks, we were on our way back home. 

Round Two

   Once home, it was another 4 long hours of planting and pulling out more ivy. For some reason the bottom flower bed was pretty much clay, so it took me forever to shovel out planting holes big enough for our flowers. The top bed was not nearly as hard because it seemed like a mixture of dirt and top soil. While I was busy planting flowers and dodging an annoying wasp, Shane was finishing up the rest of the ivy that he could pull out, then he went in for the big guns... one big jug of Round-Up! The roots and stems that were either too hard to pull up or stuck to the stones were sprayed with the weed killer. Not to make matters worse, but there is also ivy growing on the other side of the fence (of course) which should be our neighbors yard, but they have a deck in the back and what is pretty much a fence-void. Therefore, ivy grows, and we cant get back there to kill it. For now, Shane used the Round-Up to spray in between the fence slats, hopefully killing whats behind.

And The Winner is...
SHANE & ALLI

   After fighting with spaghetti-like ivy branches, flower beds made of clay, and one determined wasp. We finally finished the backyard. Here are the "after" pictures!!!


    NO MORE IVY (for now). We're pretty sure the crazy stuff will keep growing back, but for now we will enjoy the bare space. Shane has big plans to put in some Drarf Spruce trees or somes that spirals, who knows.


   And look at that beautiful flower bed!!! Yes you do see a layer of mulch, so hopefully I can be "weed free for 6 months" like the mulch bag says.

   After an exhausting day (we also planted flowers in the front yard which I'll tell about on another day), we ended up with a pretty snazzy looking backyard.  Total cost -- about $80 for flowers, soil, and mulch. All of the tools we used we already owned so they were free, and the yard bags from Lowe's were also free because we used some coupons we got from our city's waste company.

Sorry Ivy, you may live to fight another day, but for now, you are out sight - out of mind. :)